SwiftUI has taken the world of iOS development by storm, providing an intuitive and powerful way to build beautiful user interfaces across all Apple devices. While many developers have jumped on the SwiftUI bandwagon, there are still several lesser-known features waiting to be discovered.
New to SwiftUI? check out my previous article on Fundamentals of Swift UI.
In this blog post, we will explore 7 of these hidden gems that will truly make your SwiftUI apps stand out.
1. Matched Geometry Effect
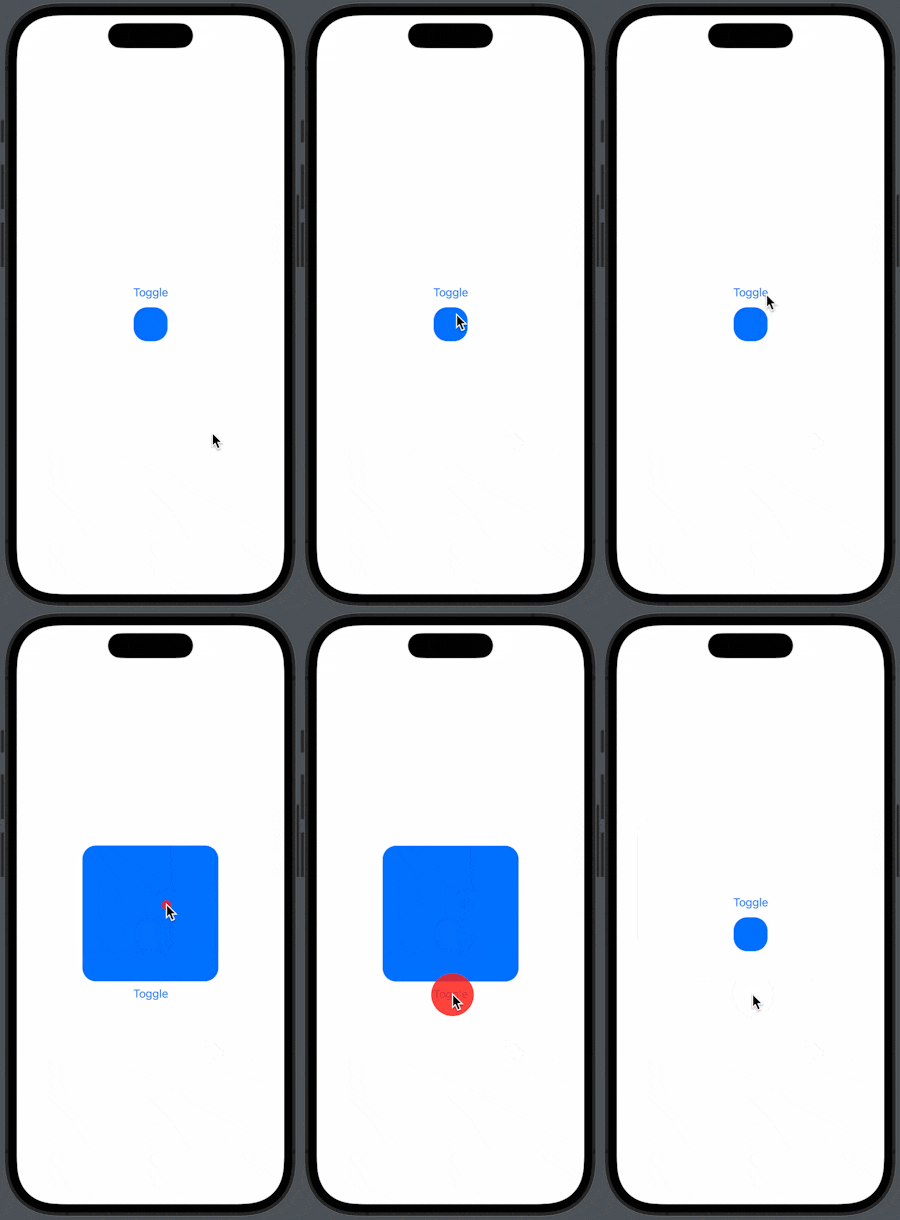
The matched geometry effect is a powerful tool to create seamless transitions between different views. It enables you to animate the position and size of elements smoothly, providing a stunning visual experience.
struct ContentView: View {
    @Namespace private var animation
    @State private var isExpanded = false

    var body: some View {
        VStack {
            if isExpanded {
                RoundedRectangle(cornerRadius: 20)
                    .fill(Color.blue)
                    .frame(width: 200, height: 200)
                    .matchedGeometryEffect(id: "rectangle", in: animation)
            }

            Button("Toggle") {
                withAnimation {
                    self.isExpanded.toggle()
                }
            }

            if !isExpanded {
                RoundedRectangle(cornerRadius: 20)
                    .fill(Color.blue)
                    .frame(width: 50, height: 50)
                    .matchedGeometryEffect(id: "rectangle", in: animation)
            }
        }
    }
}

2. Custom Environment Values
Did you know you can create custom environment values to share data across your app? This allows you to keep your code clean and modular.
struct CustomFontKey: EnvironmentKey {
    static let defaultValue: UIFont = .systemFont(ofSize: 14)
}

extension EnvironmentValues {
    var customFont: UIFont {
        get { self[CustomFontKey.self] }
        set { self[CustomFontKey.self] = newValue }
    }
}
Now, you can set the custom font as a view modifier using .environment():
Text("Hello, SwiftUI!")
    .environment(\.customFont, .systemFont(ofSize: 20, weight: .bold))
Or you can use the @Environment property wrapper to get the value from the environment:
@Environment(.customFont) var customFont
.font(Font(customFont))
3. Drawing Group
Do you want to optimize the performance of complex view hierarchies? Use the .drawingGroup() modifier to render your content as a single bitmap, dramatically improving your app's performance.
ZStack {
    Circle().fill(Color.red)
    Circle().fill(Color.green).offset(x: 10, y: 10)
    Circle().fill(Color.blue).offset(x: 20, y: 20)
}
.drawingGroup()
4. Allows Hit Testing
Control which views can receive touch events using the .allowsHitTesting() modifier. This is especially helpful when you want to disable user interaction for specific elements.
Text("Tap me!")
    .onTapGesture {
        print("Text tapped!")
    }
    .allowsHitTesting(false)
5. File Importer
Importing files from the user's device has never been easier. Use the .fileImporter() modifier to present a file picker and handle the imported files seamlessly.
struct ContentView: View {
    @State private var isImporting = false
    @State private var selectedFile: URL?

    var body: some View {
        Button("Import File") {
            isImporting = true
        }
        .fileImporter(isPresented: $isImporting, allowedContentTypes: [.plainText]) { result in
            do {
                selectedFile = try result.get()
            } catch {
                print("Error importing file: \(error.localizedDescription)")
            }
        }
    }
}
6. Overlay Preference Value
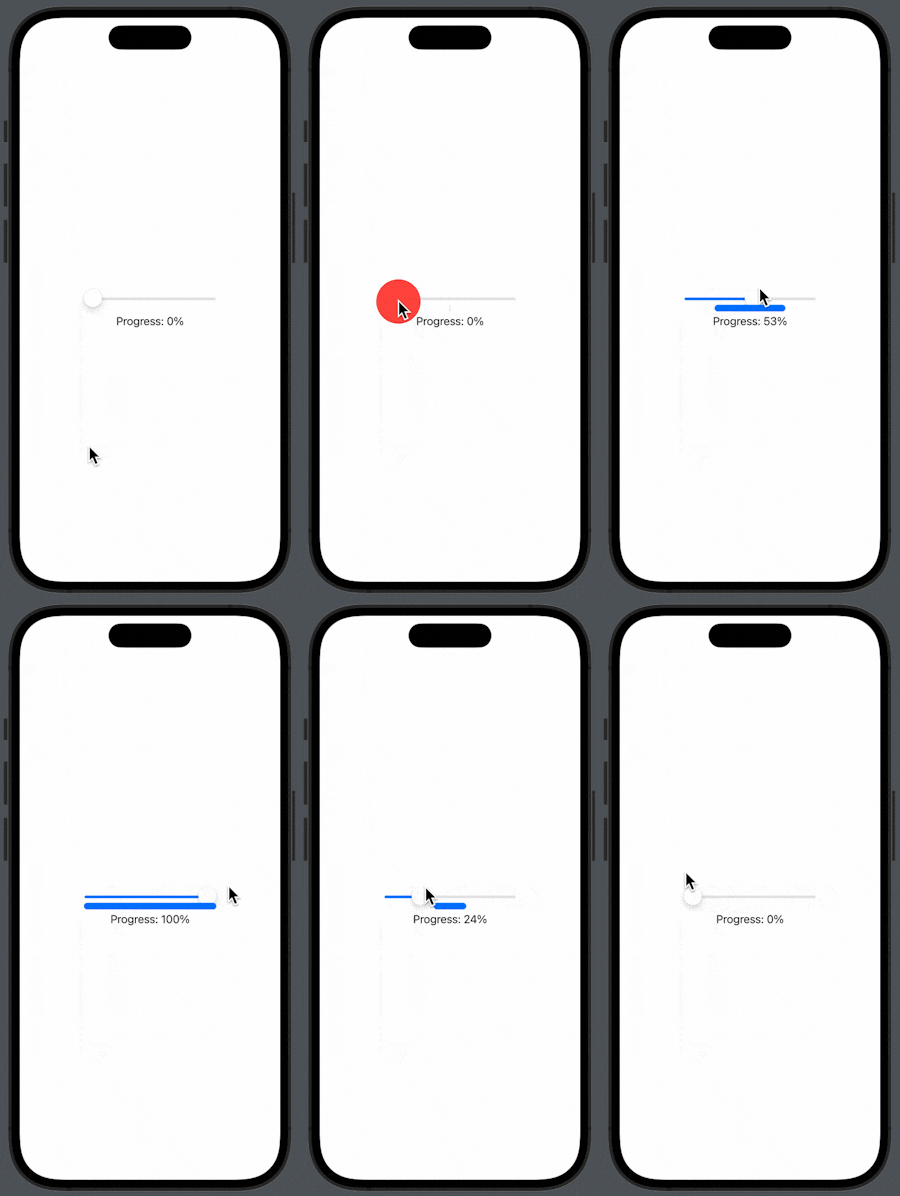
Use the .overlayPreferenceValue() modifier to create dynamic overlays on your views based on preference values. This can be particularly useful for creating custom progress bars or indicators.
First, create a custom preference key:
struct ProgressPreferenceKey: PreferenceKey {
  typealias Value = CGFloat
    static var defaultValue: CGFloat = 0

    static func reduce(value: inout CGFloat, nextValue: () -> CGFloat) {
        value = nextValue()
    }
}
Now, use .overlayPreferenceValue() to create a dynamic overlay:
struct ContentView: View {
    @State private var progress: CGFloat = 0

    var body: some View {
        VStack {
            Slider(value: $progress, in: 0...100)
                .overlay(
                    GeometryReader { geometry in
                        Color.clear.preference(key: ProgressPreferenceKey.self, value: geometry.size.width)
                    }
                )
            Text("Progress: \(Int(progress))%")
        }
        .frame(width: 200)
        .overlayPreferenceValue(ProgressPreferenceKey.self) { totalWidth in
            RoundedRectangle(cornerRadius: 5)
                .fill(Color.blue)
                .frame(width: totalWidth * (progress / 100), height: 10)
        }
    }
}

7. Task
Perform asynchronous operations right within your view hierarchy using the .task() modifier. This can be particularly helpful for fetching data from a remote API or performing complex calculations.
struct ContentView: View {
      @State private var randomNumber: Int = 0

    var body: some View {
        VStack {
            Text("Random Number: \(randomNumber)")
            Button("Fetch") {
                // This would typically be replaced with an API call or other asynchronous operation
                Task {
                    await fetchRandomNumber()
                }
            }
        }
    }

    private func fetchRandomNumber() async {
        let random = Int.random(in: 1...100)
        try! await Task.sleep(nanoseconds: UInt64.random(in: 1...3) * 1_000_000_000)
        DispatchQueue.main.async {
            randomNumber = random
        }
    }
}
By incorporating these hidden gems into your projects, you'll not only level up your SwiftUI skills, but you'll also create apps that truly stand out from the crowd.
I hope you enjoyed this article, and if you have any questions, comments, or feedback, then feel free to comment here or reach out via Twitter.
Thanks for reading!

